Tenno are out for vengeance, and Grineer Councilor Vay Hek has nowhere left to hide. Hot on his trail after the assault on Relays during Eyes of Blight, the Lotus will guide a precision strike force to hunt down and put an end to Vay Hek once and for all. Be wary Tenno. Numbers alone will not protect you when diving into the heart of Grineer military power.
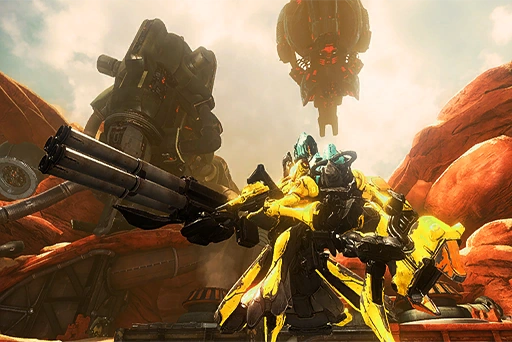
The Law of Retribution splash screen.
The Law of Retribution was the first Trialmission available in WARFRAME added in Update 16.0 (2015-03-19); where the Tenno pursue Councilor Vay Hek's location in order to defeat him and end his reign against the Tenno once and for all. This Trial was significantly more difficult and complex than the rest of the mission types, as they feature unique mechanics, special mission modifiers and obstacles not found anywhere else.
Its blueprint used to be available in the Market for 100,000 Credits 100,000. This mission required a minimum of four players and a maximum of eight players to play.
This Trial was officially removed from the game in Update 22.14 (2018-03-01) and the credits spent to build the keys were reimbursed.
The records of the best completion time of this Trial can be seen here, and its Nightmare version here.
Screen of The Law of Retribution as seen from the Market.
Vay Hek's Fomorian assault on our Relays was devastating, but he failed to break us. Now we take the fight back to him. Now we exact justice.
Players could access The Law of Retribution by crafting keys from their respective blueprints. The associated keys were one-time use and were consumed if players succeed, fail or abort the mission. The blueprints were reusable.
This is a key for the Nightmare version of The Law of Retribution, featuring more complexity and difficulty for endgame players. This mission could be initiated from Earth.
The first stage transports players into a Grineer Forest. The objective is to destroy all four Toxin Injectors present.
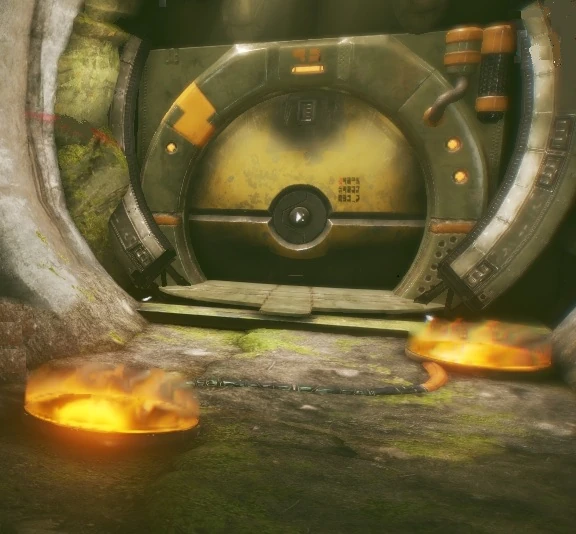
Cooperative Door, along with a pair of pads to unlock it.
From the initial spawn point, the players will encounter a door with two sets of pressure pads. These doors require two players to step on two different pressure pads to open them and will be a common obstacle throughout the entire Trial. After passing through these doors for the first time, the players will encounter poisonous gas flooding the map, which will constantly damage the players with Toxin damage. Additionally, they will gradually lose contact with the Lotus due to the said gas interfering with external connection.
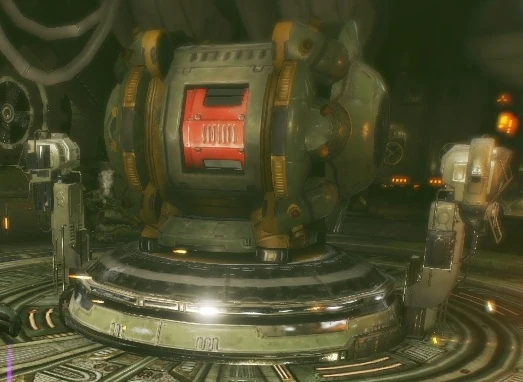
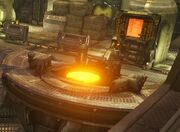
A Tritium Stabilizer with the two associated consoles.
The objective is to destroy all four Toxin Injectors. This can be done by detonating a charged Tritium Battery, which can be obtained from a Tritium Stabilizer by hacking the two respective Grineer Consoles. Once dispensed, players can charge the battery by carrying it, doing so will drain the carrier's energy by 25s-1 and prevent the use of Warframe abilities. If the carrier runs out of energy or enters bleedout, the battery will automatically drop and explode if not picked up in time. If dropped, the battery cannot be picked up by someone who has already held that battery before. Once charged, carry with care as the battery can also explode if it experiences too much rough movement, like sprinting or bullet jumping.
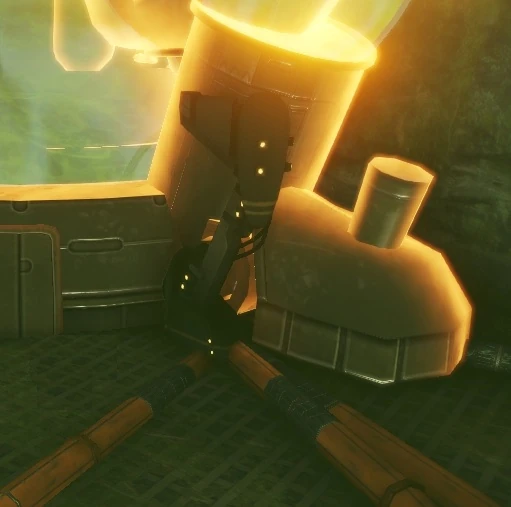
A Toxin Injector connected to pipelines which leads to their associated consoles.
There are four Toxin Injectors covered in separate protection fields. Detonating the bomb will have no effect if said field is still active, but it can be temporarily disabled by hacking four different consoles connected to the injector via orange pipeline cables. Note that taking too long to detonate the bomb will reactivate the protection field. After destroying all four, the stage will be completed and will end. The players are then transferred to the next stage.
Nightmare:
The pressure pads will gradually drain the player's energy by 10s-1, but running out of energy will not deactivate the pads.
Disruptor Drones are deployed across the enemy ranks, deploying nullifying field which disables Warframe abilities. Note drone's field does not obstruct gunfire and can be shot through.
When Hacking, players are only allowed to make up to three mistakes. Making the third will abort the hacking process and damage the players with fatal Electricity damage. In addition, Cipher uses are disabled.
All consoles can only be temporarily hacked. Taking too long will deactivate said consoles.
The Toxin gas is much stronger and will drain players' health much faster.
Fully-charged Tritium bombs will explode much more violently in a far greater radius.
Stage 2: Infiltration Mission
The second stage transports the players into a Grineer Shipyard. The objective is to infiltrate into the heart of the Grineer Military to uncover Councilor Vay Hek's location.
Stage 2.1: Decode Security System (Puzzle)
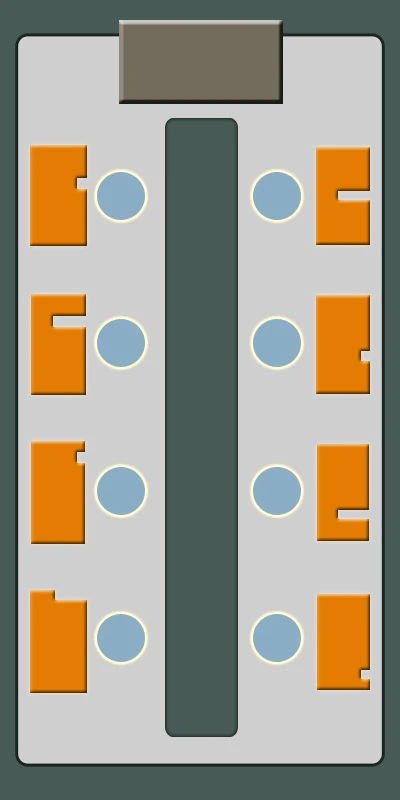
One of the eight input panels, plastered with their own letter.
From the initial spawn point, the players will encounter a large gate with a giant monitor, which is connected to eight large pressure pads each plastered with large Grineer label in front of it. This gate requires all present players to step on said pressure pads in a certain order to open them.
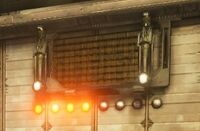
The screen where the letters will be displayed once its respective console have been hacked.
Players can learn the order of the pads by hacking one of the Grineer consoles spread across the area (see map for exact location). Hacking said console will display a Grineer label on the giant monitor, and simply stepping on the pad corresponding to the displayed symbol will advance the unlocking process.
Be warned that if players make a mistake by either stepping off their pad or stepping the wrong pad, the lock will reboot and all players on their pads will be lethally damaged with Electricity damage.
Nightmare:
The pressure pads will gradually drain the player's energy by 10s-1, running out of energy however won't deactivate the pads.
Disruptor Drones are deployed across the enemy ranks, deploying nullifying field which disables Warframe abilities. Note drone's field does not obstruct gunfire and can be shot through.
When Hacking, players are only allowed to make up to three mistakes. Making a third will abort the hacking process and damage the players with fatal Electricity damage, it is possible to survive with the use of damage reduction skills. In addition, Cipher uses are disabled.
Stage 2.2: Hijacking Fomorian Core
Hazardous railing, which will zap and deducts the core's health by 1,500 (4,000 in Nightmare) upon contact. Nearby players will also suffer the damage.
After progressing, players will be faced with a Hijack mission with a twist. Players are required to transport a Fomorian Core to the extraction point to progress. Be wary that some of the railings are hazardous and can damage the core (by ~1000 hitpoints) on contact, the core will only take damage one time per contact and be stopped in-place on electrified rail. Players can deactivate the hazard by stepping on up to three different pressure pads, refer to map for exact locations. If the core touches a rail, all players on pads must get off and back on again, the core will move backwards off the rail and can be pushed forward again. Be warned that both Vay Hek, in his Drone Form, and The Grustrag Three will spawn in the final room.
Nightmare:
The pressure pads will gradually drain the player's energy by 10s-1, running out of energy however won't deactivate the pads.
Disruptor Drones are deployed across the enemy ranks, deploying nullifying field which disables Warframe abilities. Note drone's field does not obstruct gunfire and can be shot through. Drones are actually vulnerable to most Warframe abilities including Energy Vampire and Molecular Prime, but not Radial Blind
When Hacking, players are only allowed to make up to three mistakes. Making a third will abort the hacking process and damage the players with fatal Electricity damage, it is possible to survive with the use of damage reduction skills. In addition, Cipher uses are disabled.
Hazardous railings deal 4x the normal damage (~4000 hitpoints), allowing for at maximum 2 mistakes.
Proximity mines are placed across the railing, dealing 800 points of damage to the core if they are not destroyed beforehand.
Hijack doors are terminal-locked and up to two consoles must be hacked to open the gate. Successfully hacking a console will lock the core in place until the door is open, pay attention to the position of the core, otherwise it could be locked on top of the electrified rail. It best to hack after the core has passed the hazard, or simply when the core is up against the door.
Stage 3: Vay Hek Assassination
The third and final stage transports players into a Grineer Settlement. The objective is to confront and defeat Councilor Vay Hek. The map provided below only illustrates the boss room as the tiles before are generated randomly.
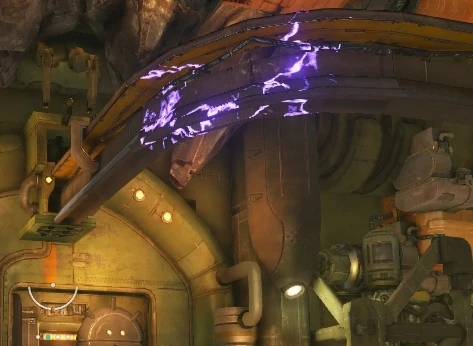
One of the five power plants, plastered with its own label.
The mission directly leads players to a boss room, where they will encounter Councilor Vay Hek inserting himself into his Terra Frame. The boss will be covered in protection field and directly attacking him will not have any effect, but it can be deactivated by destroying all five power plants powering the protective field.
Said power plants can be destroyed by detonating a charged Tritium Battery inside it, which can be obtained from random mob spawn (marked in HUD). Once obtained, the battery can be charged the same way the players do in stage 1 - Albeit with a drain rate much faster (50s-1), the battery charges 5% per tick and thus requires 500 energy to charge fully. Note that each power plants are locked by two pressure pads spread all across the map (see map for exact location), players can quickly find their respective pads by either following the pipeline cables connected to the door or match the corresponding plant labels with the pressure pad. Be warned that the battery sometimes destabilizes immediately at 100%, beginning its countdown, it is best to stand inside the power plant as the battery finishes charging so it can be thrown in quickly. Rinse and repeat until all five buildings are destroyed and defeat the boss.
One of the pressure pads, plastered with the matching label.
Be wary that the enemy mobs can activate a Grineer console that will charge the Balor Fomorian's weapon, and can be sped up multiplicatively if more consoles are hacked. If the Fomorian fires, it will annihilate the entire squad and extinguish the flames on the power plant, restarting the boss' protective field. Players can prevent this by defeating Vay Hek before it fires or by guarding the respective consoles (check map for exact location).
Once he is defeated, Councilor Vay Hek will be forced to escape the Tenno and the trial will be considered complete. If this is the player's first completion, the Lotus will award them a Sevati Sekhara badge. An alternate ending can be achieved by defeating Councilor Vay Hek in Nightmare mode--Wherein a cutscene plays, depicting the Tenno gazing over Councilor Vay Hek's broken down Terra Frame before promptly leaving the battlefield. If this is the player's first completion of the Nightmare mode, the Lotus will award them an Aseron Sekhara badge.
Nightmare:
The pressure pads will gradually drain the player's energy by 10s-1, running out of energy however won't deactivate the pads.
Disruptor Drones are deployed across the enemy ranks, deploying nullifying field which disables Warframe abilities. Note drone's field does not obstruct gunfire and can be shot through.
Aseron Sekhara badge - Upon first completion of the nightmare Trial.
Notes
Players will automatically fail the Trial if there are less than four Tenno present in the squad (whether by quitting or exhausted revives).
Players will not be eligible for another reward until the next Daily Reset.
The timer of the regular and nightmare trial are separate.
As of Hotfix 16.5.5 (2015-05-14) a bug can make the eligibility countdown display (or not display) regardless of whether you have the normal raid or nightmare raid selected. This does not affect your rewards, however.
Only affects Arcane Enhancement reward, raids can be run repeatedly for credits and rare crates.
Enemies will not scale down in difficulty with fewer players present in the mission.
The number of buttons that are to be held down in the second stage of the trial will be adjusted to the number of players, regardless if another disconnects or reconnects on the way.
The following are the effects of certain situations including ability towards a panel:
Being in a bleedout state while lying on a pressure panel in all stages of the trial will not deactivate the button, as long as you remain on it. Dying on a pad, however, will deactivate the button.
Players in the Rift Plane can't activate buttons, and entering the rift will count as leaving a button.
In the Decode part of Stage 2, players in the rift will not be electrocuted by the panel.
Hydroid using Undertow while still stepping on a panel will still count as long as he does not move away from it.
Vauban's Vortex can attract the Tritium Battery making it impossible to pick up while in the vortex; avoid using it near the injectors.
Coordination and teamwork is key. Make use of the leader mechanic and appoint someone as one. Avoid teaming up with inattentive and/or disobedient players.
Crowd Control is especially an important factor in this Trial, and as such, it is advised to have some Warframes which boast plenty of Crowd Control capabilities such as Loki's Irradiating Disarm or Nova's Molecular Prime.
Having a Trinity is also an important addition in this Trial as most of the stages requires players to keep their health (Toxin drain in the first stage), shield (the Hijack in second stage) and energy (Tritium Battery requires a high amount of energy to charge) up most of the time.
Four Corrosive Projections can be useful to strip all existing armors, and proves to be a very effective tactic when dealing with the enemies, as their highly scaled armor can prove to be a very difficult protection to bypass.
However, as the objective of all stages does not involve explicitly fighting the mobs (save for the Assassination), available Corrosive Projections can be disregarded if the cell wishes.
Having a bullet sponge such as Valkyr with Hysteria activated or bullet mitigator such as Limbo in the Rift Plane can be useful to revive downed players.
Multiple rare containers can spawn in every stage.
Rare Containers often awards 30-60 minutes of Credit Booster, which will multiply the total credit rewards up to 391,600 Credits 391,600 per run. Use Loot Detector, Animal Instinct or Thief's Wit to help bonus credits may appear in reinforced crates as well.
Bringing a few Rejuvenations can help negate the constant health drain in the stage.
This can also apply to the nightmare version of the Tritium Sabotage, albeit very impractical as it requires more than four Rejuvenations to fully negate the health drain.
Note that if you don't have enough Rejuvenations to negate the constant health drain. It can actually harm the raids progress as it makes Quick Thinking drain extra energy. This is because the toxin will take you to 2 health and drain energy, but then Rejuvenation will heal you a bit and the toxin will instantly take you back to 2 health and drain extra energy.
You can take advantage of the constant health damage to constantly activate arcanes (with trigger criteria of being damaged) with high trigger chance: Arcane Guardian and Arcane Avenger. Arcane Agility, Arcane Barrier and Arcane Grace can also be used, however will not activate as frequently due to its low trigger chance.
A Loki alone can open the co-op door all by himself, by casting Decoy onto one pad and have himself activate the other pad.
Beware that having someone step on the Decoy activated pad will disable it.
You can also open the door by yourself by standing on one pad and going to your operator mode to activate the other.
Try having a Warframe with a large energy capacity such as Nova or Loki as the battery carrier; having a Trinity to recharge their energy is also an effective synergy.
To detonate a Tritium battery faster, shoot it after dropping, be cautious to take some distance from battery before detonating as it can kill.
The various locations of the symbols. Notice how the left wing sports a cut on the upper half of the letter; while the right wing sports a cut on the lower half.
A classic and simple tip when doing the Security Room is to determine orders of players stepping firsthand with priorities in mind. For example, frames with least amount of crowd control capabilities like Trinity should go first, whilst frames with most crowd control capabilities like Banshee or Loki should go last.
Help others find their panel — waypoint (G ) their respective panel to help the squad progress.
Remember to remove waypoint if unneeded, as it can cause confusion in player communication.
It is advised for all players use any crowd control capabilities they possess, as the vast range of the room can prove difficult for any one Warframe to neutralize enemy threats alone.
Know that the label plastered to the panels are actually Grineer Numerical Alphabets, and that they are fixed to their location. In the right wing, from bottom to top are: , , and which means 2, 3, 4 and 5. Whilst in the left wing, from top to bottom are: , , and which means 6, 7, 8 and 9.
Notice the pattern of the label to easily identify the respective wings, the left wing (, , , ) sports a cut on the upper half of the letter; while the right wing (, , , ) sports a cut on the lower half of the letter.
Section 2: Hijack
If players want to defeat The Grustrag Three without having a full Corrosive Projection, bring a proc weapon such as Tysis (Corrosive-modded) in hand.
Taking few Rejuvenations will help keep the core's health at bay, negating any health drain.
Snow Globe with a maximized Ability Range can help protect the core from incoming damage, this is especially an important factor as enemies in this trial could destroy the Core in seconds.
In order to avoid core being zapped by electricity, it is good to have only one core escort person who will not move, thus not allowing core to move, until electricity is disabled. All others players should move left/right of core's "path" to avoid moving it to electric trap.
Taking a Sancti Magistar is a good idea. It will heal the Fomorian Core when you land a charged attack to an enemy.
Vay Hek is among the most dangerous threat in this mission as he is immune to all sorts of crowd control, remember to keep on the move as the rockets have a large possibility to oneshot any players.
Nyx'sAbsorb modded with maximum efficiency, due to its heightened Threat Level can keep Vay Hek's danger level relatively low, as it will trick him to continue firing his rockets at her.
Loki'sDecoy is also a good way to keep the damage output of Vay Hek low, because if you put it right in front of him he will target the decoy and not the players.
Vay Hek's armoring consists of Ferrite Armor, do not take Radiation damage and instead take Corrosive damage against him. Do note however that he is immune to Corrosive proc.
Alternatively, with four Corrosive Projection auras, he will have no armor at all, negating any bonus from corrosive damage. His health has no weaknesses or strengths.
Vay Hek is invulnerable to most, but not all status effects. Periodically proccing him for Radiation is a good way to keep him relatively harmless during his invulnerability stage as he will tend to target his own units more often than players.
Acrid is particularly good for doing this since the Toxic Sequence and Perpetual Agony mods combined will make it's procs last for up to 20 seconds.
Blinded and Radiation procced enemies will still trigger the Fomorian Console, rendering this method not as effective. Resort to other forms of procs to hinder their movement such as Sound Quake or Molecular Prime instead.
Alternatively, using Hydroid's Undertow at the center of the platform will douse all the consoles in his range, keeping it safe from the hack.
In the Hijack stage of Infiltration Mission, hijack doors can be hacked in order to open before the core has gotten near them. Hacking the doors earlier can give your team more time to step on all the pads without having to let the core return.
Avoid hacking the doors while the core is passing through a shocking area, however, since hacking a door to open causes the core to stop moving for a while and thus the risk of the core getting zapped due to a teammate getting knocked off a pad (or simply leaving it due to being inattentive) increases.
Bugs
There's a rare bug where the tritium battery will disappear and not respawn in the Vay Hek Boss fight. It should also be noted the battery takes longer to spawn the more enemies that are in the arena.
If a player hasn't picked up a battery yet, another battery can spawn in the boss fight which will delete the previous battery already spawned. This can result in batteries dropped by enemies disappearing as someone goes to pick it up.
Using Iron Skin before a battery explodes might cause the damage to bypass the invulnerability phase and deal direct damage rather than absorb into extra armor.
If a player enters bleedout while on a pad that isn't part of the security stage, the mechanic which the pads activate won't be affected regardless if all pads are activated. This is can be fixed by getting off all pads then getting back on them.
Taking a Wormhole which has its end point placed on a pad may activate, deactivate, and then activate the pad in a really quick session. This is especially dangerous in the security stage, as this will cause a force reset of all pads.
Crouching (Ctrl ) sometimes resets a pad's activation. This bug is particularly dangerous in the Hijack stage as crouching on a pad while the core is passing through the broken rail will zap the core.
When shot down in Transference mode while hacking it is possible that the console will become unhackable.
Rarely, if enough players leave during the Vay Hek boss fight to drop the amount of players below four, instead of failing the mission Vay Hek will disappear and the mission will be a success.
Sometimes Vay Hek won't fly on top of a power plant, where he will remain in the middle of the arena until he is defeated.
Very rarely, the Fomorian strike won't deal damage to players. The power plants will still reset however.
If Vay Hek is defeated before he finishes recovering from the power plant explosion his Terra Frame will either disappear, or reappear on top of the final power plant where it will slide into the spot where he was defeated without using animations.
Media
ISEGaming - The Law of Retribution (Guide)
ISEGaming - Nightmare The Law of Retribution (Guide)
Upon logging into Warframe, you will receive an Inbox message thanking you for your dedication to the Trials over the years and a new Invati Sekhara (if you have completed at least 1 Trial). All your items used to craft Trial keys over the years have also been refunded back to you.


 Electricity damage. In addition, Cipher uses are disabled.
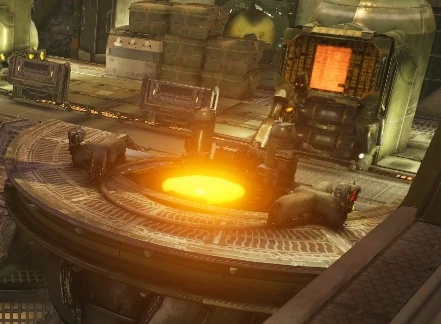


 Irradiating Disarm or
  Nova's
  Molecular Prime.
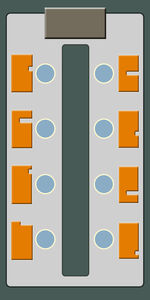
 (33 KB)")
 (28 KB)")
 (26 KB)")